Friday, June 1, 2012

Cilantro Stem Marinade

Herbs are a necessary evil. So delicious, but oh so difficult to use up. In a fit of allaying my yuppie guilt, I fixated on using up a somewhat sad bunch of cilantro. After consulting my trusty Hot Sour Salty Sweet cookbook, I had a plan. 2X cilantro.

The book taught me this: cilantro stems are not for the trash. Apparently, you can use cilantro stems for flavor! In my handy mortar, I pestled 5 garlic cloves, 2 teaspoons of black peppercorns, 3 tablespoons of coarsely chopped cilantro stems (who knew?!) and a pinch of salt. Once I had a paste, I marinated some chicken thighs in it, and soon enough, the sous chef was marching out to the grill.

The result was this ultra yummy grilled chicken noodle bowl - note the second use of cilantro. So next time you have some dying herbs, think about using the stems. Bunched together, awesome for stock/soup flavoring. Made into a paste, perfect for marinade pastes.

And when in doubt, make a dipping sauce!

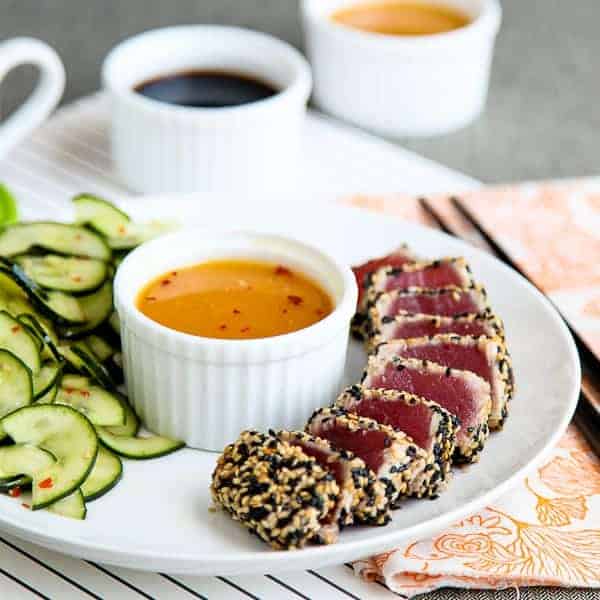
Seared sesame crusted tuna with orange ginger soy sauce

Seared sesame crusted tuna with orange ginger soy sauce (Adapted from Martha Stewart)
Serves 2-3

Orange ginger soy sauce

  • 2 tablespoons mirin
  • 2 teaspoons white miso
  • 3 teaspoons grated fresh ginger
  • 1/3 cup plus 2 tablespoons fresh orange juice
  • 1 tablespoon low-sodium soy sauce
  • 1 tablespoon plus 2 teaspoons rice wine vinegar
  • 1/8 teaspoon red-pepper flakes
  • ¼ teaspoon sesame oil
  1. Combine all of the ingredients together in a bowl.
  2. Whisk until the miso dissolves. Serve with seared tuna.

Seared sesame crusted tuna

  • ¾ to 1 lb sushi grade yellowfin tuna
  • 3 tablespoons sesame seeds
  • 2 tablespoons black sesame seeds
  • 1 tablespoon canola oil
  1. Cut the tuna into 2-3 rectangular pieces.
  2. Mix the sesame seeds together on a plate.
  3. Press the tuna into the sesame seeds on all sides.
  4. Heat canola oil in a medium skillet over medium high heat.
  5. Sear the tuna for 20 seconds on each side, then transfer to a paper towel to drain. Let rest a couple of minutes.
  6. Slice  into ¼-thick pieces and serve with orange ginger dipping sauce.

Sunday, March 25, 2012

Sex in a Pan

Prep Time: 45 minutes

Cook Time: 20 minutes

Total Time: 1 hour, 5 minutes

Yield: 10 servings

Ingredients:

Crust

  • 1 cup pecans, chopped
  • 3 tbsp white sugar
  • 1/2 cup butter
  • 1 cup flour

Cream cheese layer

  • 2 cups cream cheese
  • 1 cup powdered sugar
  • 1 cup whipping cream or cool whip

Vanilla pudding

  • 1 package of instant vanilla pudding (5.1 oz or 144 g)
  • 3 cups milk

Chocolate Pudding

  • 1 package of instant chocolate pudding (5.1 oz or 144 g)
  • 3 cups milk

Last layer

  • 2 cups whipping cream or cool whip
  • shaved chocolate

Directions:

  1. Preheat oven to 350 F degrees.
  2. Spray a 9×13 inch baking dish with cooking spray.
  3. In a mixer mix all the crust ingredients together and press the mixture into the prepared baking dish.
  4. Bake it for about 20 minutes.
  5. Prepare the vanilla pudding as per the instructions on the package.
  6. Prepare the chocolate pudding as per the instructions on the package.
  7. In a mixer add the cream cheese, powdered sugar and the cup of whipping cream. Mix until light and fluffy.
  8. Let the crust cool. Spread the cream cheese mixture over the crust evenly. Spread the chocolate pudding over the bottom crust, then the vanilla pudding. Top with the whipped cream and sprinkle with the chocolate.
  9. Refrigerate for a couple hours so that it sets.

Sunday, March 11, 2012

Eggs in Avocado Slices

Avocado Eggs

Eggs in Avocado Slices for a Festive Breakfast to Remember

Holidays are a time for indulgence. A time to relax with a leisurely breakfast shared with friends and family.

So, I am on the lookout for festive breakfast foods that will be memorable and worthy of a special occasion. 

 I decided to try my luck using an avocado slice. These Avocado Egg Rings are just the ticket. Creamy. Flavorful. Unusual. Memorable. And a bonus: they can easily be made red and green with a little sprinkle of green onion and red bell pepper garnish.

It was very recently that I discovered that avocados are delicious when gently cooked. Creamy and flavorful – they take on an almost custard-like texture.

Make these part of your Christmas morning this year – or your next Saturday breakfast for friends. Or a Meatless Monday with a bang! You may just start a new breakfast tradition.


I saw this idea on an episode of The Next Iron Chef, where heavy hitter Jeffrey Zacharian made eggs and avocados, so I decided to try this at home. It works like a dream.

There isn’t a “recipe,” really, all you do is this:

Heat a non-stick skillet to medium low heat. Lightly spray with oil. Slice an avocado with the skin ON lengthwise, forming one thick slice in the middle. (You will have some leftover avocado pieces – so, Hey! Make some bonus guacamole if you want! Guacamole for Breakfast? Why NOT? It’s the Holidays!) Remove the seed and use a small cookie cutter to make a hole in the center of your thick slice. Place the avocado slice in the pan. Crack a medium sized egg into the center of the hole. Cover and cook for a minute or two, until the egg is as you like it. Season with salt and pepper and serve.

Then, just sit back and wait for the oohs and ahhs!

Flower Power Eggs - Bell Pepper Rings for Sunny side Up eggs

Normal 0 false false false false EN-US X-NONE X-NONE MicrosoftInternetExplorer4


There’s no recipe, really, just three steps: 1) Cut bell peppers into 1/2 inch rings; 2) Place in a non-stick lightly oiled skillet; and 3) Crack an egg in the middle of each ring and cover and cook over low heat until done. If you like your yolks runny, just cook over low heat until whites are done. If you like your yolks firm, break the yolks and then cook over low heat until both whites and yolks are firm.

Salted Butter Caramel Ice Cream

Salted Butter Caramel Ice Cream

I remember the first time I saw snow.  I was in my twenties, but I felt (and acted!), like a five year old. I am almost certain I screeched with sheer excitement upon seeing inches of fluffy, white magic not only forming a soft blanket on the ground around me, but delicately falling from the sky flaunting its unique snowflake shape.

This snow spectacular was in Boston – my former residence for quite a number of years.  Winter in Boston certainly can be cold and long.  The snow can start before Thanksgiving and continue all the way through to Memorial Day.  During these months of chilly temperatures, apart from the typical memories of constant driveway shovelling, car windshield scraping, and leather boots waterproofing, there is one memory that has me shaking my head until this day.  Ice cream consumption.

It has been mentioned here, here, here and here, that New Englanders consume the greatest proportion of ice cream in the USA.  And after witnessing the hoards of lines outside fine purveyors such as JP Licks, Emack & Bolio’s, Herrell’s, and the former Steve’s (inventor of the mix-in!) throughout the city and surrounding towns, I do not question this fact at all.

I have recently been reminded of my years in Boston during my recent honeymoon.  Mr Mélanger and I took a relaxing and tranquil holiday to Tasmania.  For those unfamiliar with Tasmania, it is our most southerly state in Australia.  During our travels, we reached the magnificent World Heritage-listed wilderness of Cradle Mountain.  (Some photos from the trip below.)  As we were approaching the rugged alpine peaks of the mountain we could see they were still peppered in snow – which was a thrill to see given it is spring here in Australia.  Along the windy drive to the Lodge, it actually started to snow, too.

I had not seen snow since Boston.  I was that five year old kid again.  Moreover, after the thoughts of hoping there may be enough snow on the ground for a little snowball fight action, I thought of ice cream.  As you do.  With my ice cream food memory top of mind, I knew I would have to make some deliciously, rich ice cream as part of caramel month.

So back in sub-tropical Brisbane, I turn my attention to some refreshing ice cream.  For this task, I look to none other than the undisputed ice cream authority, David Lebovitz.  David showcases a mouth-watering double caramel ice creamon his blog.  The custard for the ice cream not only has been caramelised, but David incorporates crunchy caramel throughout the churning process at the end.  After the triple caramel feast, I elected to keep things simple, enjoying the single caramel overtones of the ice cream custard in its most pure form.

I followed the directions to the letter.  For this exercise, no point tweaking a recipe which had been expertly created.  Having made considerable quantities of homemade ice cream in the past (all due to the abundance of egg yolks I have on hand after all my macaron efforts!), I was not anxious at all by the directions.  The only area of watchfulness I noted was cooking the sugar.  If there is only one trick to making caramel, this is it.  The heating of the sugar to the right colour and temperature makes or breaks the caramel.  In this recipe, you want it to be a strong flavour, but certainly not bitter.

I have never enjoyed a caramel ice cream like this one.  Because of the caramel, it remains deliciously creamy even after freezing.  It would also be sensational with the addition of praline per David’s original recipe to add some further crunch.  I think this will be a firm favourite even after caramel month is over.

{ Salted Butter Caramel Ice Cream } 

* Ingredients *
2 cups (500 ml) whole milk, divided
1½ cups (300g) sugar
4 tablespoons (60g) salted butter
½ teaspoon sea salt
1 cups (250 ml) heavy cream
5 large egg yolks
¾ teaspoon vanilla extract

* Directions *
Make an ice bath by filling a large bowl about a third full with ice cubes and adding a cup or so of water so they’re floating. Nest a smaller metal bowl (at least 2 quarts/litres) over the ice, pour 1 cup (250 ml) of the milk into the inner bowl, and rest a mesh strainer on top of it.  Spread 1½ cups (300 gr) sugar in the saucepan in an even layer. Heat the sugar over low to medium heat until the edges begin to melt. Stir the liquefied sugar towards the centre until all the sugar is dissolved. Continue to cook stirring infrequently until the caramel starts smoking and begins to smell like it is just about to burn. Once caramelised, remove from heat and stir in the butter and salt, until butter is melted, then gradually whisk in the cream, stirring as you go. The caramel may harden and seize, but return it to the heat and continue to stir over low heat until any hard caramel is melted. Stir in 1 cup (250 ml) of the milk.  Whisk the yolks in a small bowl and gradually pour some of the warm caramel mixture over the yolks, stirring constantly. Scrape the warmed yolks back into the saucepan and cook the custard using a heatproof utensil, stirring constantly (scraping the bottom as you stir) until the mixture thickens. If using an instant-read thermometer, it should read 160-170 F (71-77 C).  Pour the custard through the strainer into the milk set over the ice bath, add the vanilla, then stir frequently until the mixture is cooled down. Refrigerate at least 8 hours or until thoroughly chilled.  Freeze the mixture in your ice cream maker according to the manufacturer’s instructions.

Saturday, March 10, 2012

Open-faced Empanadas with Tomato, Basil and Mozzarella

Canastitas Caprese (Open-faced Empanadas with Tomato, Basil and Mozzarella)


Canastitas (“little baskets” in Spanish) make a great alternative to traditional empanadas. They’re a bit quicker to put together, and they appeal to those who eat first with their eyes because they can see the filling. The classic combination of tomato, basil and mozzarella brings fresh, bright flavors to the plate, but you can use any number of fillings, just as you would with empanadas. I particularly like canastitas for cheesy fillings, however, since you don’t have to worry about them exploding and leaking melted cheese like empanadas tend to do.

These make an excellent appetizer or a light meal when combined with a green salad. ¡Buen provecho!


Canastitas Caprese (Open-faced Empanadas with Tomato, Basil and Mozzarella)

Yields 12 servings


Ingredients

12 empanada shells

3 small tomatoes, chopped

6 oz. mozzarella cheese, diced

10 basil leaves, chiffonade [thinly sliced]

kosher salt and freshly ground black pepper to taste


Directions

Preheat the oven to 425ºF. Line a baking sheet with parchment paper.

Form a ½-inch pleat by pinching together the side of the empanada shell. Fold the pleat over and press firmly against the edge of the dough. Continue to pleat and fold the empanada shell in this manner until it forms a basket shape. Place it on the baking sheet, covered with a slightly dampened dish towel. Repeat the shaping process with the rest of the empanada shells.

Evenly divide half of the cheese cubes among the canastitas, followed by all of the chopped tomato and basil. Sprinkle a tiny pinch of salt and a grind of pepper over each canastita. Top the canastitas with the remaining cheese.

Bake in the oven for about 15 minutes or until the dough and cheese turn lightly golden brown. Allow the canastitas to cool for 5 minutes before serving.

Tips: Roma tomatoes work well in this recipe because they’re not too juicy, but you can use any sort of flavorful garden tomato for the canastitas. You may want to deseed and/or drain the juice from the tomatoes once they’re chopped to keep the canastitas from getting too watery. Also, be generous with the filling—the ingredients cook down considerably in the oven.

Sunday, January 29, 2012

Your bank account of time...

“Imagine there is a bank account that credits your account each morning with $86,400. It carries over no balance from day to day. Every evening the bank deletes whatever part of the balance you failed to use during the day. What would you do? Draw out every cent, of course? Each of us has such a bank. Its name is time. Every morning, it credits you with 86,400 seconds. Every night it writes off as lost, whatever of this you have failed to invest to a good purpose. It carries over no balance. It allows no over draft. Each day it opens a new account for you. Each night it burns the remains of the day. If you fail to use the day’s deposits, the loss is yours. There is no drawing against “tomorrow”. You must live in the present on today’s deposits. Invest it so as to get from it the utmost in health, happiness and success. The clock is running. Make the most of today.”

Quote of the Day

“When I was 5 years old, my mother always told me that happiness was the key to life. When I went to school, they asked me what I wanted to be when I grew up. I wrote down ‘happy’. They told me I didn’t understand the assignment, and I told them they didn’t understand life.”

~John Lennon

Sunday, January 22, 2012

DearKimmie

Hello Friends,

I wanted to announce DearKimmie. I have been working on a new design for my blog site for the past month and it is finally up and running. I have transferred most of my posts from the past four years to the new site. I would love for my visitors to follow me there as well. There is a subscribe area & my Tweets from Twitter there also. If you want to follow me on Twitter feel free at @dearkimmie. I hope to get some feedback on what everyone thinks of the new design. I can be found on Tumblr and Wordpress so come follow me there too.

I look forward to sharing my thoughts with you for more years to come.

Love, Luck & Laughter to you all

~Blessed Be,
Kimmie